Uncategorized
Team 3 Media’s New Direction
Recently, I’ve been struggling with my business and making it grow. The problems I was having stem mostly from the model of business I had. I was basically one woman trying to act as an agency who managed the online marketing for my clients. Obviously, this was not working well. Not only was it unmanageable from a time and money stand-point, it was also slowly driving me insane. I’ve had plans to change this for a while, but I haven’t had the time or the cushion of money needed to take the business in a different direction. Now I do.
The Offer
The company that sends me most of my social media and email business, Online Marketing Giant, called me out of the blue a couple weeks ago. Chris, the President of the company has long been a friend and business colleague. He even used to be my boss at my old evil Corporate job. So, it’s safe to say that we know each other pretty well.
Still, it was a bit unexpected when he called and said that they’d like to meet about bringing me onto their team full-time. We’ve had a pretty good partnership up to this point, and I wasn’t looking to change it.
Their offer was to bring me on as a full-time project manager over their social media department. We had a meeting last week and I accepted. I’m actually pretty excited about this change for a couple of reasons.
- It gives me a much better steady pay base.
- I will be able to help more clients by focusing on planning the campaigns and using the resources of the company to fulfill those plans.
What Does This Mean for Team 3 Media?
It certainly doesn’t mean that I’m done with it. However, it does mean that I can now safely ditch the old model of businesss I had. I can, also, focus on the model of business that I’ve been dreaming about having, but haven’t had enough time to work on. That model is the “content-based business”.
Team 3 Media: A Content-Based Business
A Content-Based Business is a model of business that creates content at its core. Some of these business types rely on their traffic and ads to fuel them with money. Or they use their traffic to sell affiliate products. Or they use their traffic to sell their own content. It is the last version of this business model which I’m shooting for.
I don’t expect that I will be able to make a full-time living off this business model for a while. And that was part of my motivation in accepting this new job. It will give me time to develop this business without needing to worry about my bills being paid.
The Content
Among other things that I have planned is a series of ebooks (free and paid). If you’ve read about my “31 Days to An Awesome Facebook Page” then you’ll know what I’m talking about. That book is still definitely a part of the plan. Though, I’m delaying the launch to make sure that I get it right.
So, when can you expect to see the new content? I’m planning on launching my first free ebook in January: “7 Steps to a Successful Facebook Contest”. Until then, I’ll be working on that and some blog posts, so I can kick off 2014 right.
To My Clients
If you are or were a client of mine, you’ll be hearing this from me personally. And to any future clients, I am still available for work. You can now find me at Online Marketing Giant: cassie@onlinemarketinggiant.com.
Optimize Your Facebook Business Page Description: An Excerpt from “31 Days to An Awesome Facebook Page”
Some of you may know that I am working on a book “31 Days to An Awesome Facebook Page”. I’ve been making progress, although it’s been slow. Last week I completely rewrote a page of the book because of an email conversation I was having. I won’t show you the old version, since I think it’s pretty terrible. But I will show you what I rewrote. I think it does a much better job of explaining the importance of the Facebook Page description and what you should accomplish with it. I’d like to get your opinion, though. If you think something should be added or taken out, let me know in the comments at the end of this blog post.
None of the text below has been edited. I wrote it on the fly, so please excuse any typos, misspellings, etc. Also, please note that this may not be the final version which will appear in the book.
How important is your Facebook Page description? While I can’t tell you how many people will read it, I can tell you that it might be the deciding factor in whether someone Likes your page or even decides to do business with your company. A description of your company will not only tell your customers why they should Like your Page (don’t forget your compelling reason here) but it will also answer the question “Why should I care?” Your Facebook Page description can also aid you in being found when customers search for your services. So, optimizing it for this is a good idea.
Action for Today: Rewrite Your Facebook Page Description According To The Steps Below.
So how do you write a Facebook Page description? The first thing you need to do is grab any “about” language you already have. This can usually be found on your home or about us page on your website.
Using your website “about us” or home page blurb is a good place to start for your Facebook Page description. However, most of these are filled with stiff, formal writing and take way too long to tell what your services actually are. They also, might not include all your services. If you have some text you can work with, then grab that and put it in your favorite word processing program. Read through it, speaking it out loud. Put yourself in your customer’s or potential customer’s shoes. Does it sound like something that would explain clearly, and in a conversational tone what you do? If not, then your job is to make it sound that way. This could take a while, so strap in.
Stiff Formal Language to Look For
-
Using the name of your business instead of “we” or “us”. It’s okay to use it a couple of times. After all, this helps with search engines. Just don’t always refer to yourself in the third person er…business.
-
Using big fancy words, industry language, or lengthy explanations to explain what you do. Just tell them what you do in the quickest and most concise way possible. Bad example: Team 3 Media uses superior tools and state-of-the-art technology to build innovative websites that position you as an industry leader. The only good that can be rescued from this sentence is that we build websites. However, we could have used less and better words to describe what we do. Good example: Want a website that fits your brand personality and moves you closer to your marketing goals? We can help you with that. Check out some of the work we’ve done… Also don’t use words like innovative or industry-leader. Although, there’s nothing wrong with tooting your own horn, it’s bad form to say that about yourself. If someone else has said it and posted it online, then link to it. A description like this always sounds better if it comes from someone else, and it’s more believeable.
-
Don’t tell, show. Another thing that can be learned from the bad example above is that it tells you what we do, but doesn’t really show you. Adding pictures to your Facebook description is out of the question. However, you can add links back to your website, or even a custom Facebook tab to show examples. Let the quality of your work speak for itself.
What Your Description Should Do
Answer these questions for your customers.
-
Who are you? What makes you unique?
-
Where are you? Do you only do business locally, or are you available to work remotely?
-
What do you do?
-
How are you doing it? Do you use any tools to make you more efficient? Do you have knowledge that could make a difference in the service you provide? Do you look at a problem in a different way from others in your industry?
-
When did you start? Have you been working in this area for a while, and if not what sets you apart from your more experienced competition?
You get bonus points if you can answer these questions in story-form, especially if you’ve got a good one. Did your frustration with badly written web copy drive you to create a course to teach people to write better web copy? Then tell your customers that. It’s way more intimate and enlightening than just saying “I write good. Come take my ecourse on writing.”
You can also provide an answer for the pain point you sooth, or the need you fill. What do they get out of it? Will their new website provide them with more traffic, make it easier for their customers to find the answers they need, and generate more sales for their company? Then make sure that goes in your description.
Use Bullet Points, Headlines, and Lots of Paraghaphs
Don’t be afraid to use bullets, headlines, and lots of paragraphs to break the description up. This makes your description easier to read.
| NOTE: the headlines will not come across as being bigger (or underlined or bolded) in your Facebook description but it will create some much-needed space that makes your description easier to read. |
If you use Word to write your description, your bullet points will come across just fine. Though you may need to go back in and add an extra line between the paragraph before the bullet points. For some reason, copying and pasting from Word removes this.
Play Friendly With the Search Engines
If you are working towards search engine optimization, you have a unique opportunity to add in those keywords to your description. Be careful how many places you insert your keywords. You don’t want to stuff your description full of them. Not only is it bad for search engine optimization, but it’s also makes your description sound terrible!
While we’re on that subject, make sure that your description does not start to sound overly-formal or awkward when you add in the keywords. There’s a delicate balance between making your description readable and making sure the search engines like it.
Put Your Website Link Or Other Important Contact Info Within the First Couple of Lines
Do this only if you don’t have a brick-and-mortar location or you do most of your business from your website. By inserting a link or email address into the first part of your description, you’ll ensure that it appears (and is clickable) just below the cover photo on your Facebook Page.
Tips To Design Your Facebook Call To Action Cover Photo
Update: Facebook has done away with the 20% text rule for Cover Photos. You do still have to be careful if you’re running ads in the newsfeed though. If you are, then you’ll still want to be within the 20% text rule, as it might still apply.
Facebook has once again made a change to the guidelines for cover photos on your Facebook Page. When Facebook first launched the “Timeline” design for Pages, they decided to make it against the rules to put a “Call to Action” on the cover photo. This was a huge disappointment for a lot of businesses, because a cover photo is prime real estate that can be used to guide your followers to take an action on your Page, such as clicking on a custom tab, Facebook contest, or even getting them to call you. Marketers and businesses were forced to get clever with their “call to action” designs or they designed cover photos for branding purposes only. Now, Facebook has changed the rules again. You can not only put a call to action (such as an arrow with the words “click below to enter our contest”) but you can also add your contact information. Not allowing contact information on a cover photo was also a rule Facebook had.
Awesome! What Kind of Call to Action is Good for a Facebook Cover Photo?
Focus on what you want to promote. Are you running a Facebook or other contest? Are you having a sale? Do you have a newsletter sign up page or other custom app you would like to promote? Honestly, the options are endless here. It all comes down to making a decision and then getting the cover photo designed so that it looks great and your call to action will stand out!
But! There’s Always a But!
However, this change to the Faceboook Cover Photo guidelines also comes on the heels of their earlier change: covers may not include images with more than 20% text. This is a direct quote from their guidelines. So what does this mean? Basically, you can add your contact information and any calls to action you want, but you need to make sure that the information covers 20% or less of your image. For those of you without math or design backgrounds, that’s 1/5 of your photo or less.
What Happens If My Text Covers More Of My Cover Photo?
Good question. If you don’t run any ads on Facebook, the most that can happen, is that Facebook will remove your cover photo. At that point you can have it redesigned and reuploaded. But, if you are running ads on Facebook, you’ll want to make sure that your cover photo plays by the rules. Facebook reviews the ads that businesses make, so the chances of you getting it past the moderators is slim to none. Also, who wants to redesign something in the middle of a campaign (especially if that campaign has a time-limit on it)?
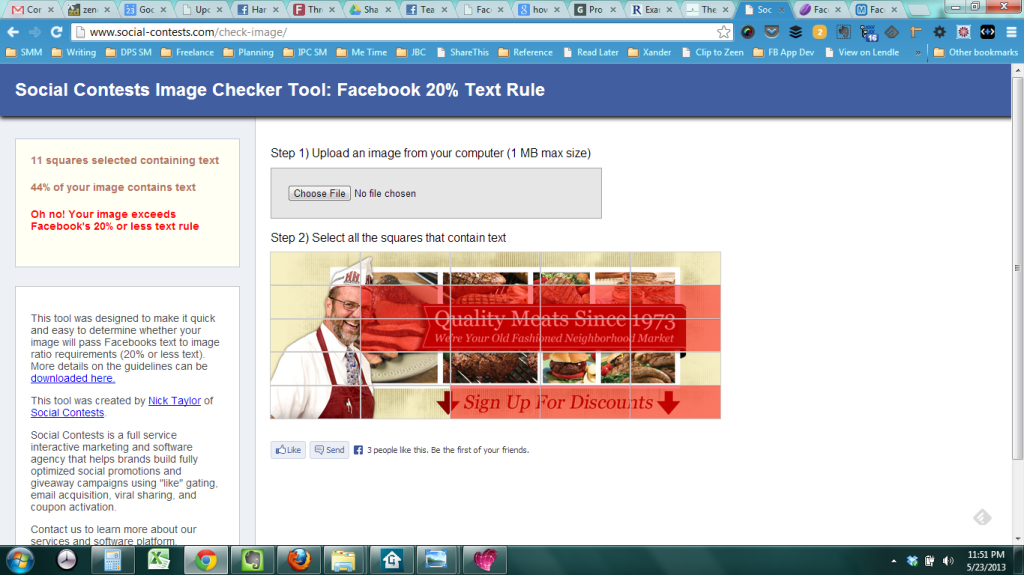
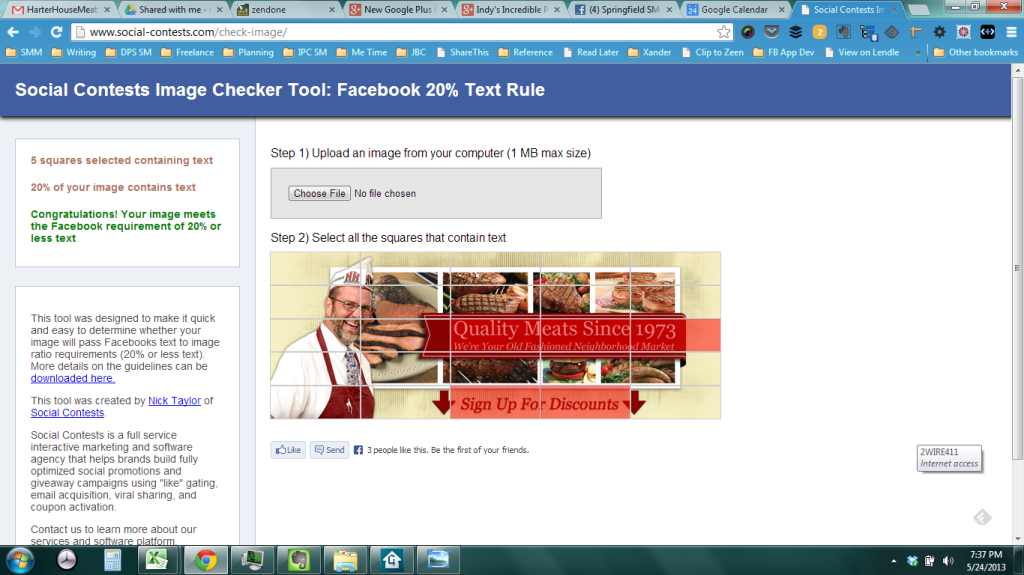
Here’s a great resource that mirrors what Facebook uses to check a cover photo against their guidelines. All you need to do is upload your photo and then click the boxes where the text appears (make sure you click a box even if there’s a tiny bit of text in it). If your text appears in 5 boxes or less, you should be in the clear. If the text appears in more than 5 boxes, you’ll need to adjust the text.
We used this free resource to check a cover photo we designed very recently for a client who wanted to promote signing up to their newsletter. As you can see (in the screenshots below) it has a nice call-to-action near the bottom promoting the newsletter signup. The first picture is a screenshot of us checking the cover photo with the tool and finding out that the text covered too much of the photo. The second picture is a screenshot of us rechecking the cover photo and finding out that it’s now in the clear.
Cover Photo Not Within Parameters
Cover Photo Within Parameters
And Finally!
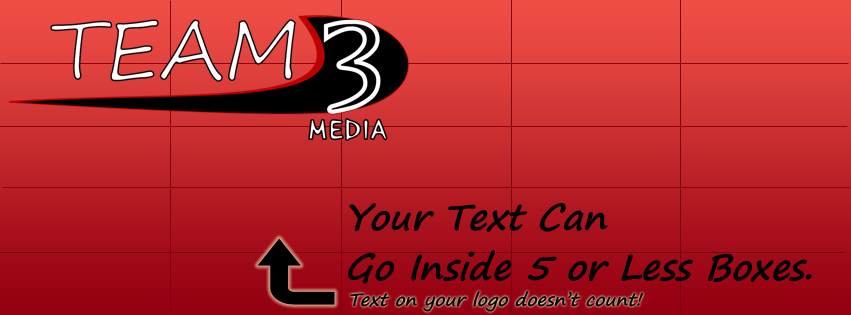
So, for those of you who want to save a little time, I have a nice resource for you! We created a Photoshop file based on the grid that you see in the online resource. If you use Photoshop, all you need to do is open it up and hide everything except the “Facebook Guides” group. We do also have the guides setup correctly in the file, if you like to use those. Hopefully this resource will save you even more time in determining whether your Cover Photos fit within the 20% rule. You can download this resource by putting in your email address below.
Put in your email address to download the free resource. We hate spam too! We'll only email you if you say we can. 🙂
The Correct Way to Use Pictures On Your Facebook Page
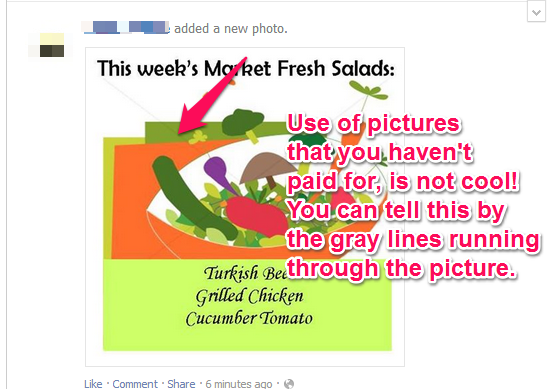
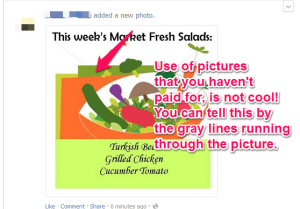 Are you guilty of using those “previews” of pictures from the stock photo sites on your Facebook Page? You can see an example to the right. After all, it’s easy to “save image as” and then post it. You didn’t even have to pay for it!
Stop! Before you add that picture to your Facebook photos, you need to know a few things.
You Are Stealing Artist’s Work
You’re In Violation Of The Sites Terms of Service
What Can Happen?
I Don’t Give A Damn About My Bad Reputation
How to Fix It
Great Resources for Using Online Photos the Right Way
So you’ve finished that blog post and now you want to find a great photo that will compel people to click on your link when they see it on Facebook. You pull up Google images and type in a word from your blog post, and lo-and-behold the internet dumps a treasure-trove of options onto your lap. You eagerly wade through the pictures, trying to find that one perfect photo that will make even the most click-weary want to read your blog post. Before you decide to “save as image” stop and ask yourself whether that picture can actually be used.
Say What?
Anyone who lived through the Napster era knows that copyright infringement happens. Sometimes we lament the loss of free services such as Napster, because it allowed us to get free content. But for the most part, we understand that copyright infringement is wrong.
The Problem
Do you remember when Google images first came into being? It was awesome. Suddenly, you could not only search for websites, you could search photos within those websites. Oh, how I loved this feature. It led to many hours of finding cool background images for my desktop. But it created a problem. Google’s indexing of pictures around the web made them seem incredibly accessible, where before they were not. Couple this with the fact that most photos published after March 1, 1989 do not require a copyright notice, and you have a recipe for easy copyright infringement. When was the last time you saw a photo from the internet with a copyright mark on it? I believe that this has led to the belief that these pictures are “free to use”.
Now, I understand wanting to use these photos, especially since iStockphoto is so expensive. I mean, what’s the harm in putting it on a blog post?
The harm is that despite all rationalizations it is still wrong. You are still “stealing” someone’s work and using it without their persmission. It’s not just a moral issue, it’s a money issue. If you had paid for that picture, you could be contributing to the livelihood of an artist (something I feel very strong about). Instead, the picture is ripped off from a website and plastered all over the internet, making it hard for that artist to get paid for their work.
Is there a solution? Can you still find a way to use the photo you desire?
Absolutely.
The Solutions
First of all there is a site that you can use to trace all instances of a photo on the internet. It’s called TinEye and we use it when we want to know where an image originated from. For artists, it can also be used to track down instances of your work across the internet. Below is a screenshot of what the front-page of the website looks like. As you can see, you can upload an image, copy and paste url, or even drag and drop a photo from another open page directly onto the TinEye website.
Because I was curious, I took the screenshot I made of their website and dropped it into the search engine. I got 39 results back. That means that 39 other people took or used a previous screenshot of TinEye’s home page.
How To Be Really Safe
There are other ways to be really safe, though. You can use free services that allow you to use their photos under a creative commons license. These are sites such as flickr and Creative Commons search that give you access to photos that can be readily used. Most of these photos only need an “attribution link” (a link back to the place where you found the photo). Though you should check the license just to be sure, as there is more than one version of the creative commons license.
There are actually many sites out there that index or host creative commons photos. Doing a Google search for creative commons images brings up a couple of sites and blog posts about the issue. One of our favorites is Photo Pin (which has a very unique interface). If you do decide to use Photo Pin and are only looking for free images, don’t click on the top row of images as they are sponsored results from iStockphoto.
Another great site is the free image search from 123rf (a stock photo site that is quickly becoming a favorite of mine). This site allows artists to upload and tag their photos as free to use. You can use their free image search to find these photos and add them to your website as long as you include the attribution link back to them.
Update!
I got into a conversation on the Small Business Forum at Social Media Examiner about this topic. Here’s a couple more resources for free (or cheap photos). First up is Comp Fight, which is actually a flickr search tool that searches only their creative commons commercial license photos . This is not that different than using flickr search itself, except that it makes searching those commercially available pictures much easier. Another great resource is this blog post by Rich Brooks where he covers 13 free or cheap stock photo sites. I love the last one (your smart phone). Which is a great free resource for photos that is probably with you 24/7! 🙂
So remember, before you use a photo that you found on the internet, make sure to check and see if you can actually use it. To be safe, always assume it is copyrighted unless it says otherwise.

